
Introduction to Greek Yogurt Jello Cups
If you’re looking for a delectable dessert that doesn’t compromise your health goals, Greek yogurt jello cups are the perfect solution! These delightful treats combine the creamy goodness of Greek yogurt with the fruity vibrance of gelatin, creating a dessert that pleases the palate without the guilt. With their rich texture and vibrant colors, Greek yogurt jello cups quickly caught the eye of health-conscious dessert lovers, becoming increasingly popular as a refreshing snack or dessert option for both adults and children.
Imagine sinking your spoon into a cool, creamy cup filled with delightful flavor. Beyond just being visually appealing, these jello cups offer an array of health benefits that elevate them beyond standard gelatin desserts. They are low in calories, high in protein, and packed with probiotics—making them a guilt-free indulgence you can enjoy without worrying about your waistline.
Benefits of Using Greek Yogurt
In recent years, Greek yogurt has surged in popularity, and for good reason! Incorporating Greek yogurt into recipes like jello cups not only enhances their taste but also bolsters their health benefits. Here’s why you should choose Greek yogurt:
- High Protein Content – Greek yogurt contains significantly more protein compared to traditional jello desserts, contributing to feelings of fullness and aiding in muscle repair.
- Probiotics – As a fermented dairy product, Greek yogurt is a natural source of probiotics, promoting gut health and improving digestion.
- Lower Sugar Levels – Many flavored Greek yogurt options have lower sugar levels than typical jello, making your dessert choice healthier without sacrificing taste.
- Weight Management – Protein-rich snacks like Greek yogurt jello cups can help manage weight by curbing cravings and enhancing metabolism.
When compared to standard gelatin desserts, Greek yogurt jello cups stand out as a nutritious alternative. This makes them a preferable treat for health-conscious individuals and families looking to provide healthier dessert options for their loved ones.
Ingredients You’ll Need
Creating your own Greek yogurt jello cups is straightforward and requires just a handful of ingredients. Here’s what you’ll need:
- Flavored gelatin dessert – The star ingredient that adds flavor and gelatinous texture; popular flavors include raspberry, strawberry, and orange.
- Boiling water – Initiates the gelatin dissolving process, ensuring a smooth consistency.
- Cold water – Helps to temper the mixture before adding yogurt.
- Vanilla Greek yogurt – Adds creaminess and depth of flavor; opt for full-fat versions for a richer mouthfeel.
- Optional fruits or nuts – Consider adding fresh berries or crunchy nuts for added nutrition and texture.
See the recipe card below for the full list of ingredients and measurements.
Step-by-Step Instructions
Making these Greek yogurt jello cups is a breeze! Follow these simple steps to whip up your dessert:
- Dissolve the gelatin: In a large heat-safe bowl, add the flavored gelatin and pour in the boiling water. Whisk for about 2 minutes, ensuring the gelatin fully dissolves. Scrape down the sides of the bowl to eliminate any undissolved bits.
- Add cold water: Once dissolved, stir in the cold water to cool the mixture down.
- Mix in the yogurt: Add the Greek yogurt to the gelatin mixture. Whisk thoroughly until everything is well combined and the mixture is smooth without any lumps.
- Portion it out: Divide the creamy mixture evenly among four 6-ounce ramekins or dessert cups.
- Chill: Refrigerate the cups for approximately 4 hours until they are thoroughly chilled and set. Make sure to leave them uncovered for the first two hours to prevent condensation from forming on the surface.
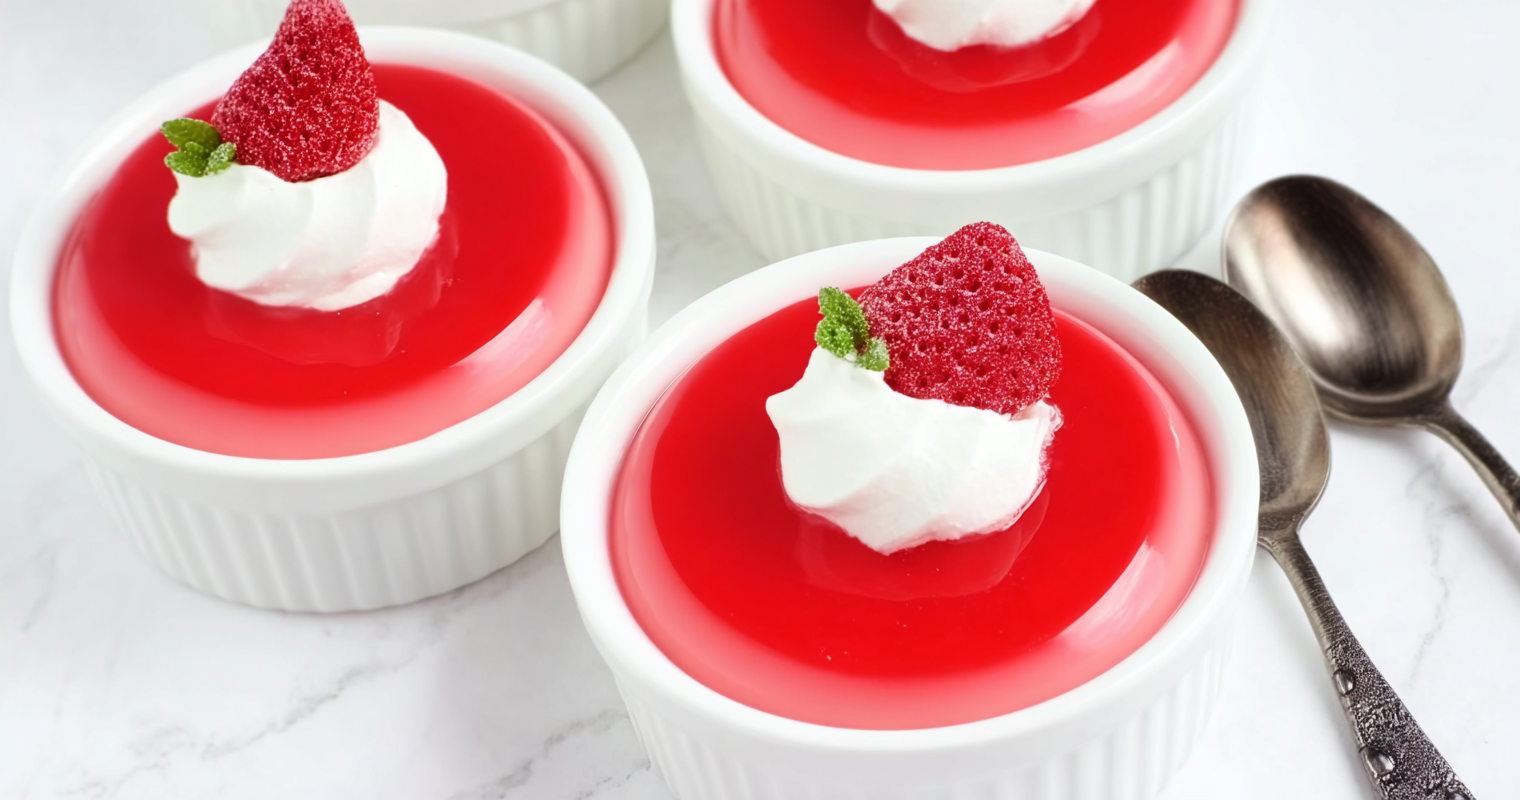
- Serve and enjoy: Once set, you can add toppings such as fresh berries, granola, or a drizzle of honey if desired. Enjoy your creamy Greek yogurt jello cups!
Tips for Perfecting Your Jello Cups
Want to achieve the perfect Greek yogurt jello cups? Here are some expert tips to keep in mind:
- Avoid over-mixing: When combining the yogurt with the gelatin mixture, whisk until smooth but avoid over-mixing, which can cause the blend to become airy and affect the texture.
- Set properly: Allowing the jello cups to set undisturbed is crucial for achieving the best results. Follow the refrigeration times closely for the ideal consistency.
- Experiment with flavors: Don’t hesitate to try different combinations of yogurt and gelatin flavors. Tropical flavors like pineapple with coconut yogurt or citrus blends provide refreshing variations.
- Creative additions: Enhance taste by introducing fruits, nuts, or even spices like cinnamon or vanilla extract. These can add depth and make the dessert even more enjoyable.
For an extra treat, serve alongside our easy strawberry ice cream which complements the fruity flavors in your jello cups.
Serving Suggestions and Variations
Unlock your creativity with diverse serving ideas and variations for your Greek yogurt jello cups:
- Fruit layers: Layer your jello with fresh fruits like sliced strawberries, blueberries, or diced peaches for a delightful contrast in textures and flavors.
- Crunchy toppings: Enhance your cups with granola or crushed nuts to add a satisfying crunch against the smooth yogurt.
- Seasonal twists: Adjust the flavor profiles based on the seasons. Use pumpkin spice gelatin in the fall or a refreshing watermelon flavor in the summer.
If you love easy desserts, try our No-Bake Cheesecake Cups as another fun way to serve Greek yogurt.
Nutritional Information
Being mindful of nutritional content is essential for maintaining a balanced diet. Here’s a breakdown of the nutritional information for each serving of Greek yogurt jello cups:
| Nutrient | Per Serving |
|---|---|
| Calories | 167 kcal |
| Protein | ~15g |
| Fat | 5g |
| Sugar | 10g |
When compared to traditional jello desserts, Greek yogurt jello cups offer a remarkable advantage with their higher protein content and lower sugar levels, making them a healthier indulgence.
Conclusion and Final Thoughts
Greek yogurt jello cups are not only a simple and fun treat but a nutritious alternative to traditional desserts. With their creamy texture, customizable flavors, and health benefits, they are sure to become a favorite in your household. So why not give this recipe a try? Experiment with your favorite flavor combinations, add your personal touch with toppings, and share your delicious results in the comments below. Embrace the world of healthier desserts today and enjoy every creamy, fruity bite!
FAQ
What type of gelatin should I use for Greek yogurt jello cups?
You can use any flavored gelatin dessert, like Jell-O. I used raspberry for a fruity touch, but feel free to choose your favorite flavor!
How long do the jello cups need to set?
The jello cups need to chill in the refrigerator for about 4 hours until completely set. Just remember to leave them uncovered for the first two hours!
Can I use non-dairy yogurt for this recipe?
Absolutely! You can substitute Greek yogurt with a non-dairy yogurt if you’re looking for a dairy-free option. Just make sure it has a similar consistency for the best results.
How can I make these jello cups even healthier?
You can add fresh fruits or nuts as toppings, or use sugar-free gelatin to cut down on calories. Experiment with different flavors and toppings to find what you enjoy most!
Are Greek yogurt jello cups suitable for kids?
Yes! Greek yogurt jello cups are a healthy dessert option that kids usually love due to their vibrant colors and fruity flavors. It’s a great way to sneak in some protein and probiotics!
Greek Yogurt Jello Cups
Ingredients
Main Ingredients
- 1 3-ounce package flavored gelatin dessert (such as Jell-O; any flavor, I used raspberry)
- ½ cup boiling water
- ½ cup cold water
- 1 cup vanilla Greek yogurt full-fat recommended for creaminess
Instructions
- Place the gelatin in a large heat-safe bowl. Add the boiling water; whisk until the gelatin has completely dissolved, about 2 minutes.
- Add the cold water; stir to combine. Then add the yogurt; whisk until the mixture is smooth and the yogurt is completely incorporated.
- Divide the mixture evenly between four 6-ounce ramekins or dessert cups/dishes.
- Refrigerate until thoroughly chilled and completely set, about 4 hours. Leave them uncovered for the first two hours.
- Enjoy! Toppings/garnishes can be added, if desired.