
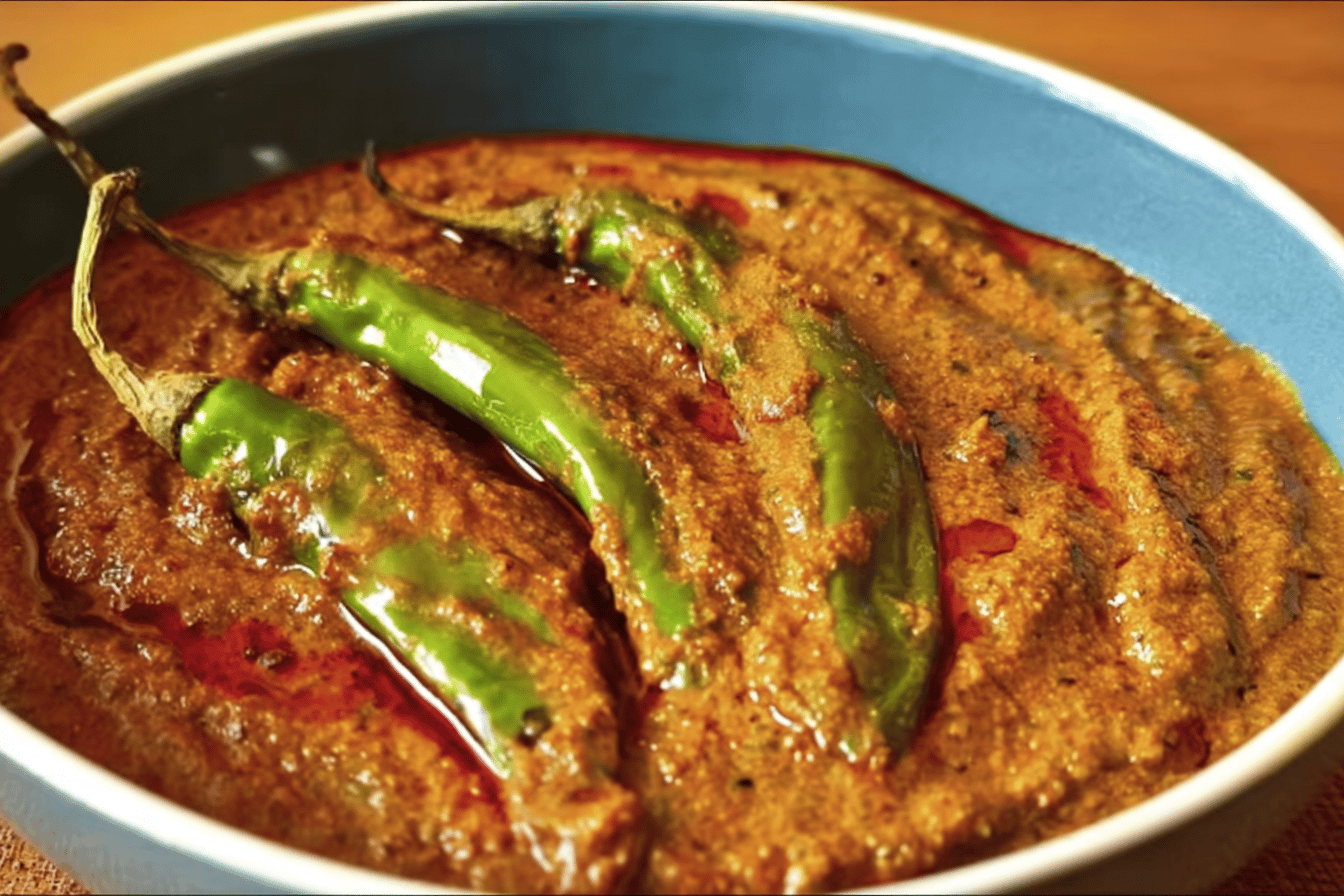
Mirchi Ka Salan is not just a dish; it’s a celebration of flavors that encapsulates the essence of Indian cuisine. Originating from the vibrant culinary scene of Hyderabad, this dish is revered for its rich, spicy, and slightly tangy flavor profile. The star ingredient, long green chillies, is complemented by a luscious, nutty sauce made from roasted peanuts, sesame seeds, and coconut, which brings a delightful creaminess to the dish. Often served alongside biryani or plain rice, Mirchi Ka Salan is a staple at festive occasions, family gatherings, and special celebrations, making it a beloved choice for those looking to spice up their meals. The dish’s unique blend of spices and ingredients showcases the art of balancing heat and flavor, making it a must-try for anyone who enjoys exploring the depths of Indian gastronomy.
Tools and Equipment
To prepare Mirchi Ka Salan, you will need a few essential tools and equipment to ensure a smooth cooking experience. Here’s a list of what you will require:
- Thick wide-bottomed pan or kadhai
- Blender or food processor
- Cutting board
- Knife
- Measuring cups and spoons
- Spatula or wooden spoon
- Kitchen towel for drying chillies
Ingredients List
Gather the following ingredients to make this delectable Mirchi Ka Salan:
- 6 – 7 Long green chillies (less spicy)
- ¼ cup Cooking oil
- 1 tsp Rai (Mustard seeds)
- 2 medium Onions (finely chopped)
- 1 tbsp Ginger-garlic paste or grated
- 1 tsp Lal mirch (Red chilli powder)
- 1 tsp Haldi (Turmeric powder)
- Salt (to taste)
- ½ cup Imli (Tamarind pulp)
- ½-inch Gur (Jaggery piece)
- 1 cup Water (or as required)
- 1 bowl Peanuts
- ½ bowl Safed til (White sesame seeds)
- 2 tbsp Dhaniya (Coriander seeds)
- 1 tbsp Jeera (Cumin seeds)
- 1 bowl Dry coconut slices
- 7 – 8 Dried red chillies
Each ingredient plays a crucial role: the green chillies provide heat, the peanuts and sesame seeds add a nutty flavor, and the tamarind pulp introduces a tangy element that balances the overall dish.
Preparation Steps
Before diving into the cooking process, here are the essential pre-cooking tasks to prepare your ingredients:
- Gather all your ingredients and ensure everything is ready before you start cooking.
- Wash the long green chillies thoroughly and dry them with a kitchen towel.
- Chop the onions and set them aside.
- Prepare the ginger-garlic paste or grate fresh ginger and garlic.
- Measure out your spices and keep them handy.
Tip: Proper preparation can make the cooking process much easier and more enjoyable!
Step-by-Step Cooking Instructions
Now that you have everything ready, let’s move on to the cooking process:
- Heat a thick wide-bottomed pan or kadhai on medium heat and add the peanuts. Saute them until you see cracks and they are slightly browned.
- Add the white sesame seeds, coriander seeds, and cumin seeds. Saute for a few seconds on medium-low flame.
- Next, add the dried coconut slices and dried red chillies. Saute all ingredients together for about 3 to 4 minutes until they become aromatic and golden brown.
- Transfer the roasted mixture to a bowl and allow it to cool down to room temperature.
- Once cooled, transfer the mixture into a blender. Add water in batches until you form a thick paste.
- Keep this paste aside in a bowl and rinse the blender with a cup of water, which you can add later to the salan.
- Prepare the long green chillies by making vertical incisions without tearing them apart, and deseed them using a small spoon or your fingers.
- In the same pan, heat 2 tablespoons of oil. Once hot, add the green chillies and sauté on low-medium flame until charred on one side. Flip and repeat.
- Remove the shallow-fried green chillies onto a kitchen towel and set aside.
- In the same pan, heat ¼ cup of cooking oil and add 1 teaspoon of mustard seeds. Saute until they crackle.
- Add the finely chopped onions and sauté until they turn translucent and golden brown.
- Add the ginger-garlic paste and sauté until the raw smell disappears.
- Add red chilli powder, turmeric powder, and salt. Mix well and sauté for a few seconds.
- Pour in the ground peanut-sesame paste and sauté nicely for about 4 to 5 minutes.
- Cover and cook, stirring occasionally to prevent sticking.
- When the oil separates from the masala, add the tamarind pulp and jaggery piece along with a cup of water. Combine well until you achieve your desired consistency.
- Cover and cook for an additional 2 to 3 minutes until it starts boiling.
- Gently add the shallow-fried green chillies and stir them into the gravy.
- Cover with a lid and simmer on low flame for another 2 minutes to allow the flavors to meld.
- Turn off the flame, and your spicy Mirchi Ka Salan is ready to be served hot!
Enjoy it alongside fragrant biryani or steamed rice for a complete meal!
Nutritional Information and Health Benefits
Mirchi Ka Salan is not only delicious but also packed with nutrients. The main ingredients contribute to its nutritional profile:
- Peanuts: Rich in protein, healthy fats, and essential vitamins.
- Green Chillies: A great source of vitamins A and C, known for boosting metabolism and having antioxidant properties.
- Coconut: Provides healthy fats and fiber, promoting heart health.
- Tamarind: Known for its digestive benefits and rich in antioxidants.
- Sesame Seeds: High in calcium and beneficial for bone health.
This combination of ingredients not only enhances the flavor but also contributes to a balanced diet when consumed in moderation.
Common Mistakes and Tips to Perfect the Recipe
To ensure your Mirchi Ka Salan turns out perfect, here are some common mistakes to avoid and tips to enhance your cooking:
- Using spicy chillies: Stick to mild green chillies if you prefer a less spicy dish.
- Over-roasting the spices: Keep an eye while roasting; burnt spices can affect the flavor.
- Improperly deseeding chillies: Ensure you remove most of the seeds for a milder taste.
- Skipping the tamarind and jaggery: Both ingredients balance the heat; don’t omit them!
- Not adjusting water: Add water gradually to achieve your desired consistency.
Storage, Serving, and Reheating Tips
Mirchi Ka Salan can be stored and enjoyed in various ways:
- Storage: Allow the salan to cool completely before transferring it to an airtight container. It can be stored in the refrigerator for up to 3 days.
- Serving: Serve hot with biryani or steamed rice. It also pairs well with naan or roti.
- Reheating: Reheat in a saucepan over low heat, adding a splash of water if necessary to maintain consistency.
For an interesting twist, consider serving it with a side of yogurt or raita to balance the spice!
FAQs and Recipe Variations
Can I make Mirchi Ka Salan without peanuts?
Yes, you can substitute peanuts with sunflower seeds or simply increase the amount of sesame seeds for a nut-free version.
What can I serve with Mirchi Ka Salan?
This dish is traditionally served with biryani, but it can also be enjoyed with plain rice, roti, or paratha.
Can I freeze Mirchi Ka Salan?
Yes, it freezes well. Just ensure it’s in an airtight container, and it can last for up to a month in the freezer.
Recipe Variations:
- Add diced potatoes or eggplant for a heartier version.
- Incorporate other spices like garam masala for an extra flavor dimension.
- For a vegan option, ensure the jaggery used is vegan-friendly.
Conclusion
Mirchi Ka Salan is a delightful dish that not only tantalizes the taste buds but also offers a glimpse into the rich tapestry of Indian culinary traditions. Its unique combination of ingredients and flavors makes it a special addition to any meal, especially during festive occasions. So, gather your ingredients, follow the steps, and savor the explosion of flavors that this dish brings to your table. Embark on your cooking journey and enjoy the process as much as the final result!