

Introduction to Chocolate Truffles
Welcome to the delightful world of chocolate truffles, where luxurious flavors and rich textures come together to create one of the most beloved confections. These indulgent treats are adored by many, not just for their taste but also for their versatility. Whether you are celebrating a special occasion or simply treating yourself, chocolate truffles offer a satisfying experience that delights the senses. Their creamy, melt-in-your-mouth quality is simply irresistible, making them a staple at various celebrations including weddings, holidays, and romantic dinners. With an array of flavors and endless possibilities for customization, creating your own chocolate truffles is as much a fun project as it is a delicious endeavor.
Historical Background and Cultural Significance
The story of chocolate truffles is as rich as the dessert itself. Their origin can be traced back to the late 19th century, with many historians attributing their creation to the French. As chocolate gained popularity throughout Europe, confectioners began experimenting with new forms and flavors, leading to the creation of these luxurious little morsels. Over the years, truffles have evolved, incorporating various flavor profiles and techniques, making them not just a treat but a culinary art form.
Chocolate is not simply a delicious treat; it holds significance across various cultures. In ancient Mesoamerica, chocolate was revered as a sacred drink, often associated with rituals and celebrations. Today, chocolate is a common element in cultures worldwide, symbolizing love, indulgence, and celebration. From the gifting of chocolate on Valentine’s Day to its presence on birthdays and holidays, truffles remind us of life’s sweet moments.
Ingredients You’ll Need
To create your own chocolate truffles, you’ll need a few essential ingredients. Here’s a breakdown of what you will require:
- Quality semi-sweet or bittersweet chocolate – the star of the show, providing rich flavor and texture to your truffles.
- Heavy cream – adds creaminess and helps in achieving that smooth ganache.
- Unsalted butter – optional, but it contributes to a luscious, velvety finish.
- Pure vanilla extract – enhances the overall flavor profile, making the truffles even more delicious.
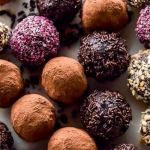
- Toppings – such as unsweetened cocoa powder, sprinkles, crushed nuts, or melted chocolate to add texture and visual appeal.
See the recipe card below for the full list of ingredients and measurements.
Step-by-Step Instructions
Making chocolate truffles is a straightforward process. Follow these detailed steps to create your own delightful treats:
- Place the chopped chocolate in a heat-proof bowl. This is the foundation of your truffles, so ensure it’s been finely chopped for even melting.
- Heat the heavy cream until it simmers. You can do this on the stove or in the microwave; just be careful not to boil it.
- If using butter, add it to the chocolate. Then pour the hot cream over the chocolate, covering it completely. Let it sit for five minutes. This resting period helps the chocolate melt evenly.
- After five minutes, stir gently until the chocolate has completely melted, creating a rich ganache. If you’re adding vanilla extract, do so at this point.
- Cover the bowl with plastic wrap, pressing it directly on the surface of the ganache to prevent a crust from forming. Refrigerate for one to two hours, or until firm enough to handle.
- Once the ganache is set, use a small scooper to scoop out pieces about the size of a teaspoon. Roll each piece in your hands to form a ball. It’s okay if the mixture gets a little sticky; this is a sign of a delicious truffle!
- Roll each truffle in your desired toppings, if using. Cocoa powder, crushed nuts, or sprinkles can give a delightful finish.
- For the best taste, serve the truffles at room temperature. Enjoy your confectionery creation!
- Store tightly covered at room temperature for 3-4 days or in the fridge for up to two weeks.
Tips for Perfect Truffles
Here are some expert techniques to ensure your truffles come out perfectly:
- **Temperature Management:** Keep an eye on the temperature of your ingredients. Room temperature butter helps in blending smoothly with chocolate, while simmering cream should never reach a rolling boil.
- **Consistency Matters:** The ganache should be creamy but firm enough to be scooped. If it’s too soft, refrigerate for longer; if too firm, gently warm it for a few moments until manageable.
- **Coating Tips:** When coating truffles, ensure they’re well-chilled for a more manageable rolling experience. This prevents them from melting in your hands.
- **Common Mistakes:** Avoid over-stirring the ganache once the chocolate has melted, as this can introduce air and alter the ideal smooth texture.
Flavor Variations & Toppings
One of the greatest joys of making chocolate truffles is experimenting with flavors and toppings. Here are some creative ideas:
- Matcha – infuse your ganache with matcha powder for a vibrant, slightly earthy flavor.
- Espresso – add instant espresso powder to the ganache for a boost of coffee flavor that pairs wonderfully with dark chocolate.
- Fruit-infused – consider incorporating fruit purees or zests, such as citrus, for a refreshing twist.
- Toppings – roll your truffles in cocoa powder for a classic look, or try chopped pistachios, shredded coconut, or drizzled caramel for a gourmet touch.
Explore new flavor combinations with our lemon truffles, which add a zesty twist to traditional recipes.
Storage Tips for Chocolate Truffles
Proper storage is essential for maintaining the delightful flavor and texture of your truffles:
- **Room Temperature:** Uncoated truffles can be stored in a cool place for 3-4 days without refrigeration.
- **Refrigeration:** For longer shelf life, place them in an airtight container in the refrigerator. They can last for up to 2 weeks when properly stored.
- **Freezing:** You can also freeze truffles for up to three months. Just make sure to use airtight containers to prevent freezer burn. Thaw them in the fridge, not at room temperature, to maintain texture.
Serving Suggestions & Pairings
Chocolate truffles are versatile and can be served in numerous delightful ways:
- **Presentation**: For gatherings, place truffles in elegant boxes or on a decorated platter to create an impressive display.
- **Pairings**: To complement the rich flavors, serve your truffles with bold beverages like red wine or espresso. A glass of champagne can also elevate the experience.
- **Special Occasions**: Present truffles as gifts for birthdays, anniversaries, or holidays. They can also serve as a luxurious finish to a romantic dinner.
For a delightful dessert pairing, consider serving your truffles with our chocolate raspberry cupcakes.
Frequently Asked Questions
After diving into the creamy world of chocolate truffles, you may have a few questions:
- What type of chocolate should I use for truffles? For the best flavor and texture, use quality semi-sweet or bittersweet chocolate. You can also experiment with dark, milk, or even white chocolate for different tastes.
- How long do homemade chocolate truffles last? Homemade chocolate truffles can be stored at room temperature for 3-4 days or in the refrigerator for up to 2 weeks. Just make sure to keep them covered!
- Can I use substitutions for heavy cream? Yes! You can substitute heavy cream with coconut cream for a dairy-free option, but the texture may vary slightly.
- What toppings are best for chocolate truffles? You can use a variety of toppings like cocoa powder, sprinkles, crushed nuts, or even melted chocolate. Get creative with flavors that complement your truffles!
- How can I make my truffles more flavorful? Add in flavors like vanilla extract, espresso, or liqueurs to your ganache for extra depth. You can also infuse flavors into the cream before mixing it with the chocolate.
The love for truffles extends beyond classic recipes, as seen in our chocolate truffle cake, a modern confectionery representation.
Homemade Chocolate Truffles Recipe
Ingredients
Chocolate Mixture
- two 4-ounce quality semi-sweet or bittersweet chocolate bars 226g, very finely chopped
- 2/3 cup 160ml heavy cream
- 1 Tablespoon 14g unsalted butter, softened to room temperature (optional)
- 1/2 teaspoon pure vanilla extract optional
- Toppings: unsweetened cocoa powder sprinkles, crushed nuts, melted or tempered chocolate
Instructions
- Place the chocolate in a heat-proof bowl. Set aside.
- Heat the heavy cream until it is simmering. You can heat it on the stove or in the microwave.
- Add the butter, if using, to the chocolate and pour the heavy cream evenly on top. Let the warm cream and chocolate sit for 5 minutes. Add the vanilla extract then stir until the chocolate has completely melted. Place a piece of plastic wrap directly on the surface and refrigerate for 1-2 hours.
- Scoop the set truffle mixture into 2 teaspoon-sized mounds. Roll each into balls.
- Roll each into toppings, if desired. Truffles taste best at room temperature!
- Cover tightly and store truffles at room temperature for 3-4 days or in the refrigerator for up to 2 weeks.