
Introduction to Homemade Breadsticks
Have you ever had a meal that felt incomplete without a warm, fluffy breadstick on your plate? There’s something nostalgic about homemade breadsticks, evoking memories from family dinners or gatherings with friends. The aroma of freshly baked bread wafting through the kitchen can instantly lift spirits and create a cozy atmosphere. Making breadsticks from scratch is not just a recipe; it’s a warm invitation to connect, share, and create memories around the dinner table.
Imagine sitting down to a delicious meal, and instead of the usual store-bought options, you have a plate of golden-brown, garlic-butter-topped breadsticks. The satisfaction of making them yourself is unmatched, and they elevate even the simplest of meals to something special. Whether it’s an Italian-themed dinner or a casual family supper, these breadsticks are sure to impress and delight everyone.
Ingredients You’ll Need
Before you embark on this culinary adventure, it’s essential to gather your ingredients. Using high-quality items will make a noticeable difference in flavor and texture. Let’s break down the key components you’ll need:
- Warm water – this is crucial for activating the yeast and helps create a soft texture in the breadsticks.
- Yeast – instant or active dry yeast will give your breadsticks that perfect rise. Make sure it’s fresh for the best results!
- Sugar – just a bit of sugar is essential as it feeds the yeast, helping to create beautiful, fluffy breadsticks.
- Unsalted butter – melted butter adds richness and flavor. You can substitute it with olive oil for a healthier option.
- Salt – a pinch of salt enhances the flavors and balances the sweetness of the dough.
- Bread flour – this type of flour has higher protein content, which gives your breadsticks the ideal chewiness. All-purpose flour can work but may alter the texture.
- Garlic powder (optional) – adds a delightful garlic flavor to the breadsticks. You could also use fresh minced garlic if you prefer.
- Dried herbs (optional) – consider adding dried parsley or other favorite herbs for a flavorful twist!
See the recipe card below for the full list of ingredients and measurements.
Step-by-Step Instructions
Making homemade breadsticks is a straightforward process, and with a little patience, you’ll have soft, warm treats ready in no time. Here’s a comprehensive guide to prepare your dough, shape, and bake your breadsticks:
Preparing the Dough
Start by whisking the warm water, yeast, and a touch of sugar together in a mixing bowl. Allow the mixture to sit for about 5–10 minutes until it develops a foamy, frothy top, indicating that the yeast is activated. Next, add in the melted butter, salt, and a cup of bread flour. Mix on low speed until you have a combined mixture.
Gradually add in the remaining flour, beating on medium speed until the dough pulls away from the bowl’s sides, which typically takes around 2 minutes. Once the dough comes together, continue beating for an additional 8-10 minutes. If you prefer kneading by hand, work the dough on a floured surface until it feels smooth and elastic.
Letting It Rise
Once your dough has been kneaded, lightly grease a large bowl with oil. Place the dough inside and turn it to coat all sides in the oil. Cover the bowl with foil or a kitchen towel and let it rise in a warm area for approximately 1.5 to 2 hours, or until it has doubled in size. This is a vital step that contributes to the fluffiness of the breadsticks.
Shaping the Breadsticks
After the dough has risen adequately, it’s time to punch it down to release excess air. Divide the dough into two pieces and then each piece into seven smaller sections, rolling each into an approximate 8-inch log. Lay the shaped breadsticks on lined baking sheets, ensuring they have enough space to expand. Cover them again and let them rise for about 20 minutes while preheating your oven to 400°F (204°C).
Baking Your Breadsticks
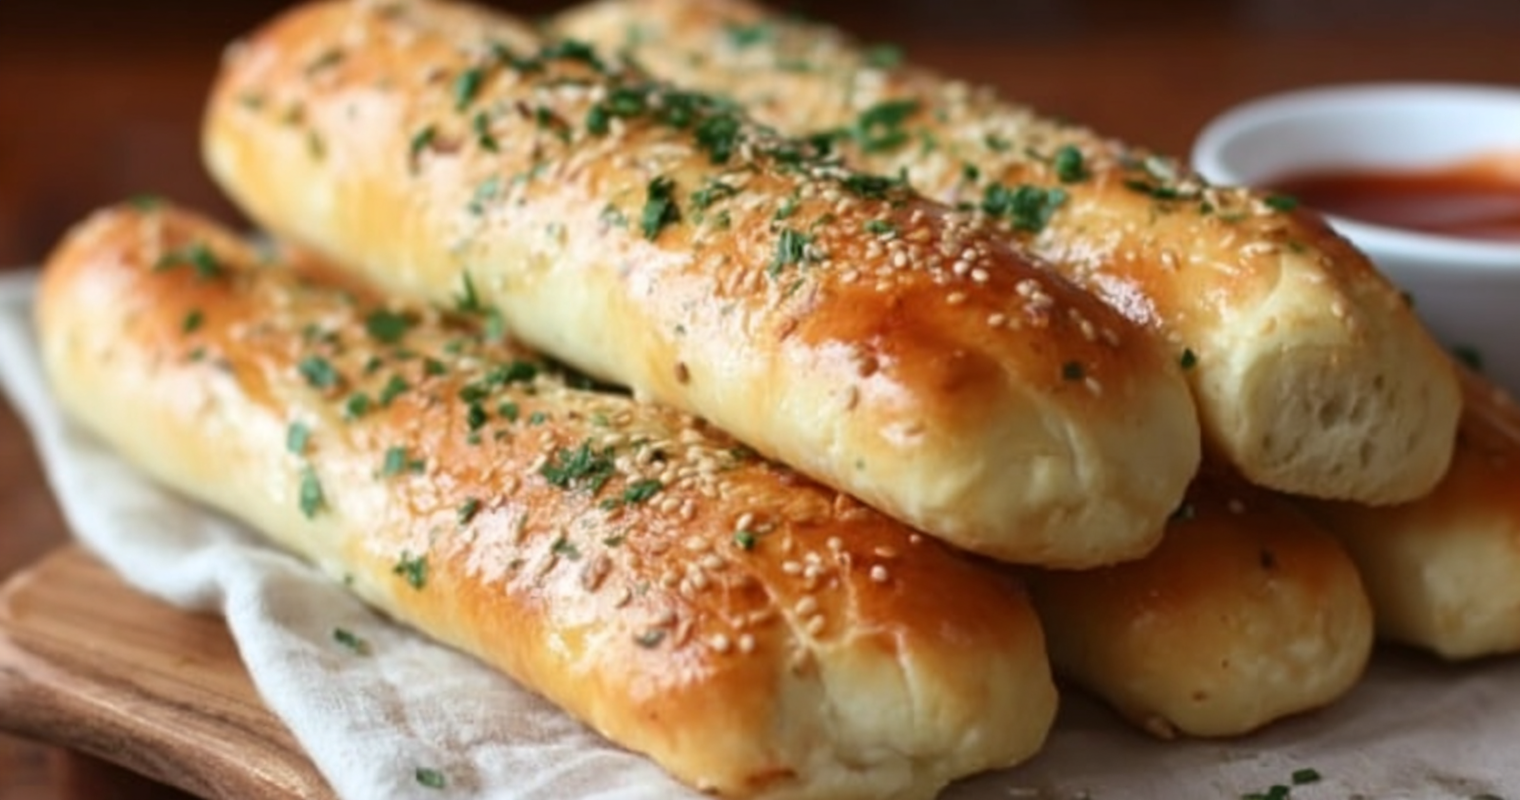
Once your oven is preheated, uncover the breadsticks and bake them for 18-19 minutes, or until they are a lovely golden brown. While the breadsticks bake, prepare a garlic butter topping by melting additional butter and mixing in salt and garlic powder. As soon as your breadsticks come out of the oven, brush them generously with this mixture for added flavor.
Tips for Perfect Breadsticks
Achieving the perfect texture and flavor in your homemade breadsticks might require some practice. Here are some expert tips to help you succeed:
- Kneading Technique – Be patient while kneading; this develops gluten which gives the bread its elasticity and chewiness.
- Rising Time – Don’t rush the rising process; allowing the dough ample time to rise helps in achieving a soft interior. If your kitchen is cold, consider placing it in a slightly warm oven.
- Oven Temperature – For consistently baked breadsticks, ensure your oven is properly preheated. Using a pizza stone can also help maintain heat during baking.
- Golden-Brown Crust – Keep an eye on the breadsticks as they approach the end of the baking time – remove them when they are beautifully golden.
- Keeping Them Soft – Cover them with a kitchen towel right after baking to help retain moisture and keep the insides soft.
Variations and Flavor Ideas
One of the best aspects of homemade breadsticks is their versatility! You can easily customize them to suit different tastes and dietary needs:
- Cheesy Breadsticks – Add shredded cheese directly into the dough or sprinkle on top before baking.
- Herb-Infused – Mix in dried herbs like oregano, basil, or rosemary for a fragrant variation.
- Garlic Breadsticks – Boost the garlic flavor by mixing minced fresh garlic into the dough.
- Sweet Dessert Breadsticks – Incorporate a cinnamon-sugar topping for a sweet treat, perfect for breakfast or dessert!
- Gluten-Free Option – Substitute bread flour with a gluten-free baking blend, keeping in mind that results may vary.
Serving Suggestions
Now that your breadsticks are ready, you might be wondering how to best serve them. Here are some delightful pairing ideas:
- Serve alongside a classic marinara sauce for dipping – it’s a crowd-pleaser.
- Enjoy them with olive oil and balsamic vinegar for a simple starter.
- Enhance your meal by pairing them with soups or salads, making them a perfect complement.
- These breadsticks pair perfectly with our chicken pasta primavera for a delightful meal.
Hosting a themed dinner? Consider incorporating them into an Italian night along with hearty pasta dishes!
Storing Leftovers
It’s likely you’ll have some delicious breadsticks left – but no worries! To keep them fresh:
- Store leftovers tightly covered at room temperature for up to a day.
- If you want to keep them longer, refrigerate for about five days.
- For extended storage, freeze them in an airtight container. They will stay fresh for up to three months!
To revive leftover breadsticks before serving, wrap them in foil and reheat in a preheated oven at 350°F (175°C) for about 10-15 minutes – this helps maintain their softness!
FAQ
Can I use all-purpose flour instead of bread flour?
Yes, you can use all-purpose flour, but the breadsticks may not be as chewy or have the same texture as those made with bread flour, which has a higher protein content.
What can I substitute for garlic powder?
If you don’t have garlic powder, you can use minced fresh garlic or omit it altogether. Adjust according to your taste preference!
How do I know when the dough has risen enough?
The dough is ready when it has doubled in size and feels light and airy. You can gently poke it, and if it springs back slowly, it’s good to go!
Can I freeze the breadsticks after baking?
Yes! Let them cool completely, then store them in an airtight container or freezer bag. They can be frozen for up to three months.
What’s the best way to reheat leftover breadsticks?
To reheat, wrap the breadsticks in foil and place them in a preheated oven at 350°F (175°C) for about 10-15 minutes. This keeps them soft and delicious!
Conclusion: Enjoy Your Homemade Breadsticks
There you have it – a complete guide to making homemade breadsticks that will impress everyone at your table. We hope you give this recipe a try and enjoy the wonderful aroma and taste of freshly baked bread. Don’t hesitate to experiment with different flavors and share your experiences with family and friends. Homemade food carries a unique joy and can truly enhance family meals, making every bite cherished.
Enjoy these breadsticks alongside morning glory muffins for a heartwarming breakfast.
Have fun in the kitchen and happy baking!

Homemade Soft Breadsticks
Instructions
- Whisk the warm water, yeast, and sugar together in the bowl of your stand mixer. Loosely cover and allow to sit for 5–10 minutes until foamy and frothy on top.
- Add the melted butter, salt, 1 cup (130g) bread flour, and garlic powder, if using. With a dough hook attachment, mix on low speed for 30 seconds, then add the remaining flour. Beat on medium speed until the dough comes together and pulls away from the sides of the bowl, about 2 minutes.
- Keep the dough in the mixer and beat for an additional 8-10 full minutes, or knead by hand on a lightly floured surface for 8-10 full minutes.
- Lightly grease a large bowl with oil or nonstick spray. Place the dough in the bowl, turning it to coat all sides in the oil. Cover the bowl with aluminum foil or plastic wrap.
- Allow the dough to rise in a relatively warm environment for 1.5–2 hours or until double in size.
- Line 2 baking sheets with parchment paper or silicone baking mats. Set aside.
- When the dough is ready, punch it down to release the air. Divide the dough in half. Working with 1 half at a time, cut 7 pieces, roughly equal in size. Roll each piece of dough into a log about 8 inches long.
- Cover shaped breadsticks and allow to rise until slightly puffy, about 20 minutes.
- Meanwhile, preheat oven to 400°F (204°C).
- Remove cover from breadsticks and bake for 18–19 minutes or until golden brown on top.
- Melt butter, and stir in salt and garlic powder.
- Remove breadsticks from the oven, brush with garlic butter topping, and allow breadsticks to cool for a couple minutes before serving.
- Cover leftover rolls tightly and store at room temperature for 1 day or in the refrigerator for up to 5 days.