

Introduction to No Bake Cheesecake
No bake cheesecakes are a sweet revelation for anyone who loves dessert but dreads preheating the oven. Imagine a creamy, indulgent cheesecake that requires no baking—simply mixing the ingredients and letting it chill is all that’s needed. This method of making cheesecake is not only easy but also remarkably versatile, accommodating various flavors and dietary preferences with ease.
The appeal of no bake cheesecake stretches beyond mere convenience. For busy bakers—whether you’re preoccupied with family gatherings, summer parties, or just want to enjoy a delightful treat without heat—this dessert stands out. It offers an effortless way to impress guests or enjoy a luxurious dessert at home without spending hours in the kitchen.
I recall a summer barbecue where the hosts surprised everyone with a vibrant no-bake cheesecake topped with fresh berries. It was a crowd favorite, delightfully creamy and cool, a perfect end to a sunny evening. It’s moments like these that showcase the charm of no bake cheesecakes, making them a go-to for gatherings all year round.
Ingredients You’ll Need
Creating a luscious no bake cheesecake begins with a few essential ingredients. Here’s what you’ll need:
- Vanilla wafer crumbs – serves as a sweet, buttery base that complements the creamy filling.
- Granulated sugar – enhances sweetness and helps bind the crust.
- Salt – a pinch elevates the flavors of sweet and savory.
- Unsalted butter – adds richness to the crust and helps it stick together.
- Cream cheese – the star of the filling, bringing a rich, tangy flavor that forms the base of this dessert.
- Instant pistachio pudding mix – not only provides flavor but also helps thicken the cheesecake, giving it that perfect texture.
- Vanilla extract – offers warmth and depth in flavor.
- Pistachio extract – enhances the nutty flavor, creating a more complex taste experience.
- Powdered sugar – lends a smooth sweetness to the filling and reduces grittiness.
- Heavy cream – whipped into the filling and topping, it adds airy lightness and creaminess to the cheesecake.
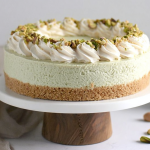
- Chopped pistachios – a decorative and flavorful topping that adds a nutty crunch.
For a healthier option, consider making a yogurt cheesecake that can be a tasty alternative to the traditional no-bake version.
See the recipe card below for the full list of ingredients and measurements.
Step-by-Step Instructions
Now, let’s dive into the essential steps for crafting your no bake cheesecake:
- Prepare the crust: In a bowl, combine the vanilla wafer crumbs, granulated sugar, salt, and melted butter. Stir until well combined.
- Form the crust: Pour the mixture into a cheesecake or springform pan lined with parchment paper at the bottom. Using a flat-bottomed measuring cup, gently press the mixture into the bottom and up the sides of the pan to form an even layer.
- Chill the crust: Place the crust in the refrigerator and chill for about 30 minutes until firm.
- Make the filling: In a large mixing bowl, add room temperature cream cheese. Use an electric hand mixer to cream until smooth. A stand mixer with a whisk attachment works well here too.
- Incorporate flavorings: Add the pistachio pudding mix, vanilla extract, pistachio extract, and powdered sugar. Mix on low speed until fully combined; scrape the sides of the bowl for even mixing.
- Add cream: Gradually pour heavy cream into the mixture. Start mixing on low speed, then increase to medium-high, whipping until the mixture is light, fluffy, and smooth—this should take a few minutes.
- Fill the crust: Spoon the pistachio cheesecake filling into the prepared crust, smoothing the top with an offset spatula.
- Chill the cheesecake: Cover the cheesecake and chill for at least 6 hours or overnight for the best flavor and texture.
- Prepare the topping: In a mixing bowl, combine heavy cream, powdered sugar, and vanilla extract. Whip on medium-high speed with an electric mixer until stiff peaks form.
- Top the cheesecake: Spread the whipped cream evenly over the chilled cheesecake or pipe it on for decorative flair. Finish with a sprinkle of chopped pistachios if desired.
Tips for the Perfect Cheesecake
To ensure your no bake cheesecake is a silky-smooth success, consider these expert tips:
- Use room temperature ingredients: This is crucial, particularly for the cream cheese, as it allows for easier blending and reduces the risk of lumps in your filling.
- Chill adequately: Allowing the cheesecake to chill will enhance its firmness and flavor. For best results, aim for overnight chilling.
- Springform pan usage: Using a springform pan makes it easy to release the cheesecake without damaging the edges.
- Whipped cream care: When folding in whipped cream, do it gently to preserve the lightness. Over mixing can deflate the whipped cream.
- Stabilizing the filling: If you prefer a firmer texture, consider incorporating gelatin or agar-agar to the mixture. This adds stability without baking.
Unique Flavor Combinations
No bake cheesecakes shine because of their adaptability to different flavors. Here are some innovative variations to inspire your next creation:
- Chocolate Ganache: Drizzle melted chocolate ganache over your chilled cheesecake for a decadent chocolate twist.
- Fruit Purees: Swirl in strawberry or raspberry purees for a vibrant, fruity flavor.
- Matcha: Incorporating matcha powder can add a beautiful green hue and earthy flavor, perfect for tea lovers.
- Pumpkin Spice: In the fall, additive pumpkin puree and spice for a festive feel.
For a fruity twist, try our no-bake blueberry cheesecake that perfectly showcases the versatility of this dessert.
If you’re a fan of peanut butter, check out our no-bake peanut butter pie for a delicious alternative.
Serving Suggestions
The way you present your no bake cheesecake contributes significantly to the overall experience. Here are some creative serving ideas:
- Toppings: Consider topping your cheesecake with fresh fruit, chocolate shavings, or a sprinkle of chopped nuts to add texture and flavor.
- Garnishing: A mint leaf or a drizzle of caramel sauce can elevate the presentation and make your cheesecake visually appealing.
- Pairing with beverages: Match your cheesecake with coffee, tea, or champagne, depending on the occasion.
- Occasions: This cheesecake is perfect for birthday parties, family gatherings, or as a delightful end to a summer picnic.
Nutritional Information and Health Benefits
Indulging in dessert doesn’t have to mean compromising on nutrition. Here’s a brief overview of the potential health benefits of your no bake cheesecake:
- Caloric Control: By choosing lower-fat cream cheese or Greek yogurt in place of some standard ingredients, you can create a lighter version without sacrificing much flavor.
- Healthy Toppings: Adding fresh fruits not only garnishes but also increases fiber and vitamin intake.
- Natural Sweeteners: Opting for alternatives to refined sugar, such as honey or maple syrup, can lower the glycemic impact and add unique flavors.
FAQs About No Bake Cheesecake
Can I use a different type of crust for this no-bake cheesecake?
Absolutely! While this recipe calls for a vanilla wafer crust, you can use crushed graham crackers, chocolate cookies, or even a nut-based crust for a delicious twist.
How long does the cheesecake need to chill?
It’s best to chill the cheesecake for at least 6 hours, but overnight is even better! This allows it to firm up properly and enhances the flavors.
Can I make this cheesecake dairy-free?
Yes! You can substitute the cream cheese with a dairy-free alternative like cashew cream or vegan cream cheese. Use a non-dairy whipped topping for the topping as well.
What can I do if my cheesecake is too soft?
If your cheesecake is too soft, it might need more chilling time. Alternatively, you can fold in gelatin or agar-agar when making the filling for added stability.
How should I store any leftovers?
Store leftover cheesecake in an airtight container in the refrigerator for up to 3-4 days. Just be sure to keep the toppings separate until you’re ready to serve!
No Bake Pistachio Cheesecake
Instructions
- In a bowl, combine vanilla wafer crumbs, granulated sugar, salt, and melted butter. Stir to combine.
- Pour vanilla wafer crumbs into a cheesecake pan or springform pan lined with a parchment paper circle on the bottom.
- Using a flat-bottomed measuring cup or drinking glass, gently press the vanilla wafer crumbs along the bottom and up the sides of the pan.
- Chill the crust for 30 minutes until firm.
- Add room temperature cream cheese to a large mixing bowl and cream with an electric hand mixer on medium speed until smooth.
- Add pistachio pudding mix, vanilla extract, pistachio extract, and powdered sugar. Mix on low speed until well combined.
- Pour in heavy cream and mix on low speed. Then whip the mixture until light and fluffy.
- Spoon the filling into the prepared crust and smooth it out.
- Chill the cheesecake for at least 6 hours or overnight.
- In a mixing bowl, combine heavy cream, powdered sugar, and vanilla extract and whip until stiff peaks form.
- Top the cheesecake with whipped cream and sprinkle with chopped pistachios if desired.