

Introduction to Granola Bars
Granola bars have become an increasingly popular snack choice in today’s fast-paced world. As the trend toward healthy eating grows, more people are seeking convenient options that fit into their on-the-go lifestyles. Granola bars serve as a quick source of nutrition, offering everything from sweet satisfaction to a boost of energy. While countless store-bought granola bars line supermarket shelves, many individuals are discovering the joys and benefits of making their own at home. Homemade granola bars not only provide a healthier alternative to their processed counterparts but also allow for customization, taste, and freshness.
Imagine a snack that is packed with wholesome ingredients, free from preservatives, and tailored to your personal flavor preferences. That’s the beauty of homemade granola bars! They can be tailored to suit specific dietary needs and provide you with a delicious treat, whether you are hiking, at school, or simply enjoying a busy day.
Benefits of Homemade Granola Bars
Making granola bars at home comes with an array of benefits that make them a superior choice compared to store-bought varieties.
- Cost-Effective – Homemade granola bars are typically less expensive to make than purchasing pre-packaged options. By investing in bulk ingredients, you can significantly reduce the cost per bar.
- Control Over Ingredients – When creating your granola bars, you have complete control over what goes into them. You can choose organic ingredients or avoid added sugars and artificial flavors to keep them healthy.
- Customization for Dietary Needs – Everyone has different dietary restrictions, whether due to allergies or personal preferences. By making your own, you can ensure they are nut-free, gluten-free, vegan, or tailored to suit any specific eating plan.
- Freshness and Quality – Homemade granola bars retain their freshness much longer since they don’t contain preservatives. This freshness also translates to better taste and quality with each bite.
Nutritionists often emphasize the importance of home-prepared snacks. As registered dietitian Sarah Koszyk states, \”Prepackaged snacks often contain hidden sugars and preservatives, while homemade options let you choose nutritious ingredients that contribute positively to your health.\” This makes homemade granola bars a fantastic alternative.
Essential Ingredients for Granola Bars
A successful homemade granola bar recipe relies on several essential ingredients, each contributing to flavor, texture, and nutritional value. Here’s a closer look at some key components you may want to include:
- Oats – The primary ingredient, oats serve as a hearty base filled with fiber and nutrients.
- Sweeteners – Options like honey or maple syrup not only bring sweetness but also help to bind the bars together.
- Binders – Nut butter plays a crucial role in holding the bar together, adding creaminess and flavor. Consider using peanut butter, almond butter, or for a nut-free option, sun butter.
- Puffed Rice Cereal – This ingredient adds lightness and crunch, creating a delightful texture in your bars.
- Dried Fruits – Enhance flavor and sweetness with additions like dried cranberries, apricots, or banana chips.
- Seeds – Pumpkin or sunflower seeds can be great nut-free substitutes, providing healthy fats and crunch.
- Spices – A sprinkle of cinnamon or nutmeg can elevate the flavor profile of your granola bars, creating a delightful aroma.
See the recipe card below for the full list of ingredients and measurements.
Step-by-Step Instructions for Making Granola Bars
Now that you have a clear understanding of the essential components, let’s dive into the step-by-step process of crafting your very own homemade granola bars:
- Start by gathering your ingredients and equipment. You’ll need a microwave-safe bowl, a mixing bowl, a spatula, and an 8-inch square pan lined with parchment paper.
- Begin by combining the sweetener, like honey, and nut butter in the microwave-safe bowl. Heat it in the microwave for about 30 seconds to soften the nut butter, allowing for easier mixing.
- After melting, stir in a dash of vanilla extract until the mixture is smooth and well-combined.
- In a large mixing bowl, combine the oats, puffed rice cereal, shredded coconut, salt, cinnamon, chopped nuts, and dried fruits.
- Pour the warm peanut butter mixture over the dry ingredients, stirring until everything is completely combined. You might have to use your hands to ensure the mixture is mixed evenly.
- Transfer the mixture into the prepared square pan, pressing it down firmly to help the bars hold their shape when cut.
- Freeze the mixture for at least 2 hours to solidify.
- Once firm, remove the bars from the pan and slice them into equal-sized pieces.
- For an added touch, prepare a coating by whisking together Greek yogurt, softened cream cheese, powdered sugar, and milk to thin.
- Dip each bar into the yogurt mixture, place them on a lined baking sheet, then drizzle with melted white chocolate, if you desire.
For another delicious homemade snack, you can also try our banana bread recipe, perfect for baking enthusiasts.
Tips for Customization and Flavor Variations
One of the greatest advantages of homemade granola bars is the opportunity for customization. Here are some ideas to personalize your bars according to your preferences:
- Chocolate Chips – For a touch of indulgence, consider adding dark chocolate or white chocolate chips to the mixture.
- Dried Fruits – Get creative with your mix of dried fruits. Options like raisins, apricots, or cherries can add a delightful sweetness.
- Seeds – Enhance your bars with chia seeds or flaxseeds for an added nutrient boost.
- Spices – Experiment with different spices to create unique flavor profiles. For instance, pumpkin spice, cardamom, or ginger can introduce a whole new taste.
- Nut-Free Variations – Use seeds like sunflower and pumpkin as substitutes for nuts for those with nut allergies.
While customizing your granola bars, ensure that the balance between dry and wet ingredients is maintained for optimal texture.
Storage Tips and Serving Suggestions
Keeping your homemade granola bars fresh is essential for enjoying them at their best. Here are a few storage tips:
- Store your granola bars in an airtight container in the refrigerator for up to two weeks.
- For longer-lasting options, consider freezing the bars. They can stay fresh for up to three months when properly sealed in a freezer bag or container.
You can also get creative with how you serve these delicious snacks. They work wonderfully as a post-workout treat, a breakfast on the go, or in school lunches. Pair your homemade granola bars with a delicious Greek yogurt parfait for a well-rounded snack or breakfast option.
Frequently Asked Questions about Granola Bars
Curious about some common concerns related to granola bars? Here are some frequently asked questions:
- How long do these homemade granola bars last?
When stored properly in an airtight container, these granola bars can last up to two weeks in the refrigerator. For longer storage, consider freezing them, which can keep them fresh for up to three months! - Can I substitute the peanut butter in the recipe?
Absolutely! You can use any nut butter, like almond or cashew butter, or even sun butter if you’re looking for a nut-free option. - What can I add for extra flavor or nutrition?
Feel free to get creative! You can add chocolate chips, dried fruits, or seeds. Spices like cinnamon or nutmeg can also enhance the flavor! - How do I prevent my granola bars from crumbling?
Make sure to press the mixture firmly into the pan before freezing. This helps the bars hold together better. If they still crumble, try adding a bit more peanut butter or honey to help bind them. - Are these granola bars suitable for a vegan diet?
Yes, you can easily make these granola bars vegan by using maple syrup instead of honey and ensuring your nut butter is vegan-friendly.
Conclusion
Making homemade granola bars is an enjoyable and fulfilling process that promises to reward you with healthy and delicious snacks. The ability to control ingredients means you can tailor them to suit your dietary needs while enjoying the freshest flavors. So why not gather your ingredients and try your hand at making your own granola bars? You’ll love the satisfaction of crafting these tasty treats and the creativity that comes with experimenting with flavors. We would love to hear about your own creations and experiences, so please share your delicious results!
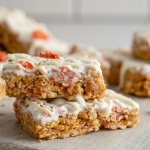
Granola Bars with Yogurt Coating
Instructions
- In a microwave safe bowl, combine honey and peanut butter. Microwave for 30 seconds to soften the peanut butter, creating a runny consistency. Add vanilla extract. Whisk until smooth.
- In a large mixing bowl, combine oats, puffed rice cereal, shredded coconut, salt, cinnamon, almonds, and freeze dried strawberries.
- Pour peanut butter/honey mixture over the dry ingredients. Stir to combine. It may help to use your hands to ensure everything is fully mixed.
- Press the mix into a parchment paper lined, 8-inch square pan. This is essential to ensuring the bars stay together. Freeze for at least 2 hours.
- Once the bars are frozen, gently slice into 16 equal-sized granola bars.
- To make the yogurt coating, whisk together Greek yogurt, softened cream cheese, powdered sugar, and milk.
- Dip the top of each granola bar into the yogurt coating and place on a parchment lined baking sheet. Drizzle with melted white chocolate and sprinkle with additional freeze-dried strawberries if desired. Store in the freezer!